 Intro
Intro
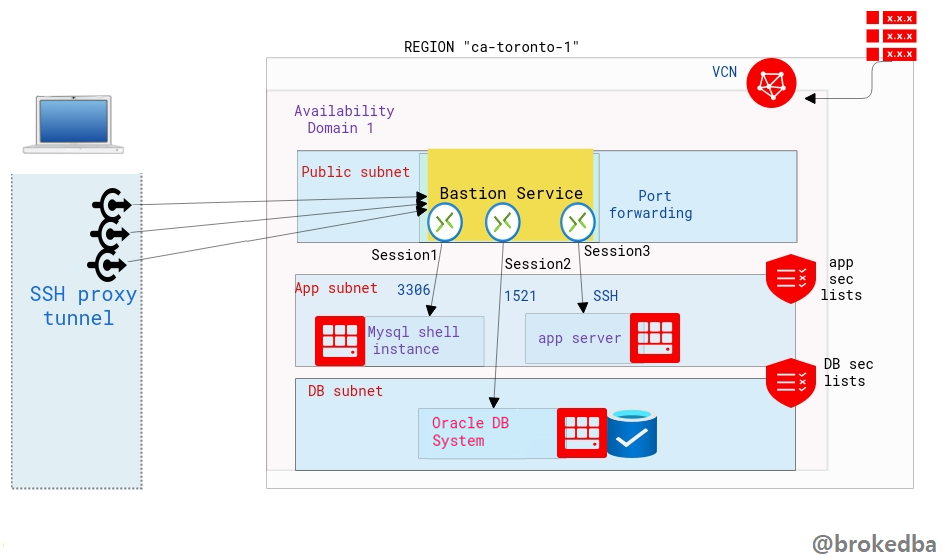
In the cloud, bastion or jump server is the only node exposed to the outside world and acts as a gateway between the private network where your backend resources (application, databases..etc) are hosted and the Internet. A Bastion runs bare minimum applications and is extremely secure. Even if any network can access it, it is still fortified against illegal entry and attack.
But What if there was another disruptive way to provide that sort of remote access without needing to configure a VM in a public subnet ?
Quick table of contents
- What is Bastion service and why is it revolutionary
- Create Bastion Service using the Console
What is OCI Bastion service and why is it revolutionary
Let me demonstrate why OCI Bastion service makes your life easier. Imagine every team in your organization wanting their own Bastion VM because hey they're not fan of sharing their stuff with others. For each of your teams you would have to:
- Create a public subnet
- Create a VM in that subnet
- Ensure the hardening and constant auditing of your bastion VMs
- Pay for the CPU and other resources of your bastion VM for each team.
OCI Bastion service is a FREE serverless, clientless connectivity that enables you to connect from anywhere-on any device or platform-(without an additional agent installation) to your instances In your private subnets.
You can leverage the ssh tunnel for literally any port via port-forwarding feature. Your target system can be a database compute instance (DBCS,MYSQL, EXACS,..) or any app server within your private subnets.
Why OCI Bastion service is better than other providers equivalent offerings
- Azure Bastion service: Azure makes you pay for the service $$ (per hour) –> OCI bastion is free
- AWS Systems Manager Session Manager: requires an agent install on each target vm, OCI bastion doesn’t
- GCP Identity-Aware Proxy (IAP) for TCP: restricted to IAM users granted permissions to use IAP TCP forwarding
Exactly, with Oracle Bastion service, you not only won’t need to worry about creating, hardening or paying for a bastion vm anymore, but the service is FREE and you won’t have to install any agent nor grant permissions.
Create Bastion Service
Let’s see how to create the bastion service through the Console, OCI CLI, and terraform. The bastion service is linked to the target subnet and a bastion session will define the port forwarding to the target instance.
Our environment :
- VCN vcnterra has the private subnet db-sub with a CIDR of 192.168.78.0/24
- DB instance IP is 192.168.78.10
I. From the console
- Under Identity & Security section on the Console menu, click `Bastion` or just search Bastion on the Console browser.

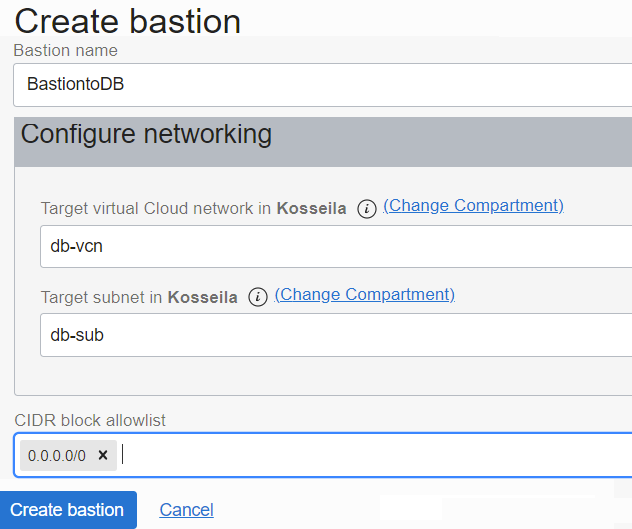
- Hit “Create Bastion”, and give a name for your Bastion Service, select the target VCN & subnet, along with the CIDR block representing a white-list network from which you want to connect to the target instance, and create the Bastion.

CIDR allowlist: 0.0.0.0/0 means you can ssh the db instance from anywhere.
2. Create the bastion session
We will now create the bastion session where we will define the forwarded port through the tunnel and the target IP
- Click on the Bastion name to access the Bastion details page from which you can click on create bastion session.

Note:
There are two session types, SSH Managed which requires a cloud agent and port forwarding session which we need.
You can either generate, upload, or paste your SSH public key.
3. Generate the SSH command
- Once the session is created click on the right side 3 dots button and select Copy SSH command.

- It should look like the below . You will need to replace privateKey with it’s local path and Localport with 22

- Final result will looks like this, notice I added & to run it in the background, so I won’t have to open another session to login to the private DB instance.
# ssh -i ~/.ssh/id_rsa_oci -N -L 22:192.168.78.10:22 -p 22 ocid1.bastionsession.oc1.ca-toronto-1.amaaaaaavr**a@host.bastion.ca-toronto-1.oci.oraclecloud.com &
- Run the final ssh command to access the target resource using a sort of loopback where localhost is forwarded into the target instance IP through the opened proxy tunnel.
# ssh -i  ~/.ssh/id_rsa_dbcs opc@localhost
[opc@hopsdb-oci ~]$ cat /etc/redhat-release        --- target instance
 Red Hat Enterprise Linux Server release 7.9 (Maipo)
[opc@hopsdb-oci ~]$ ifconfig  ens3
ens3: flags=4163<UP,BROADCAST,RUNNING,MULTICAST>  mtu 9000
inet 192.168.78.10  netmask 255.255.255.0  broadcast 192.168.78.255
Warning: Beware as It’s important to distinguish between : - ssh key pair used to used to build the Bastion session
- ssh key pair used in the target vm (our db instance) upon creation
- The first is used when we run the bastion command , the second is used when connecting as opc@locahost .
Conclusion
In this article we learned
- How slick is OCI Bastion service becoming a game changer thanks to its serverless connectivity to private networks.
- How OCI Bastion service compares to the competition’s offering available in other Cloud providers
- How to create OCI Bastion service using the Console.
- With the above there is no excuse not to try this super cool feature that is absolutely FREE.
Thanks for reading
No comments:
Post a Comment