Monday, March 28, 2022

What they don't tell you about refreshable PDB clones (ghost archives)

This image has an empty alt attribute; its file name is image-9.png

Intro

In my previous blog post, I showcased how to automate the refresh of a PDB clone using a DBMS scheduler job which gives a better control on the frequency, instead of relying on the minutely refresh. Handy if you don’t like keeping an automatic refresh every X minutes and rather have it run once a day at a specific time to avoid unexpected maintenance. But along the way I started to discover a strange behaviour on the source/production environment from where my refreshable PDB clone was being updated. Let’s find out what has actually happened after few refreshes.     


1. Refreshable Clone PDB environment

Refresh Scheduled nightly (4AM)

I am not going to describe the full configuration, since I already wrote about it in detail in my other blog post but will at least share the job defined to perform the daily refresh using dbms scheduler.

1- The refresh procedure

CREATE OR REPLACE PROCEDURE sys.psprod_refresh AS BEGIN EXECUTE IMMEDIATE 'ALTER PLUGGABLE DATABASE PSPDB_RO CLOSE IMMEDIATE'; EXECUTE IMMEDIATE 'ALTER PLUGGABLE DATABASE PSPDB_RO REFRESH'; EXECUTE IMMEDIATE 'ALTER PLUGGABLE DATABASE PSPDB_RO OPEN READ ONLY'; END;/

2- The refresh JOB

BEGIN
DBMS_SCHEDULER.CREATE_JOB (
job_name => 'PSPROD_REFRESH_JOB',
job_type => 'STORED_PROCEDURE',
job_action => 'sys.psprod_refresh',
repeat_interval => 'freq=daily;byday=mon,tue,wed,thu,fri;BYHOUR=4; BYMINUTE=1',
auto_drop => FALSE,
enabled => TRUE,
comments => 'Automatic refresh of the prod PDB clone');
END;
/

SQL>@check_job PSPROD_REFRESH_JOB
JOB_NAME     REPEAT_INTERVAL     
------------------ --------------------------------------------------------
PSPROD_REFRESH_JOB
freq=daily;byday=mon,tue,wed,thu,fri;BYHOUR=4; BYMINUTE


Ghost archives in the source CDB

It took me few weeks before I realized that the archive log disk started to fill up a bit, even if the archive logs were cleaned up after each backup due to a defined retention (7 days) in RMAN.

What did I notice ?

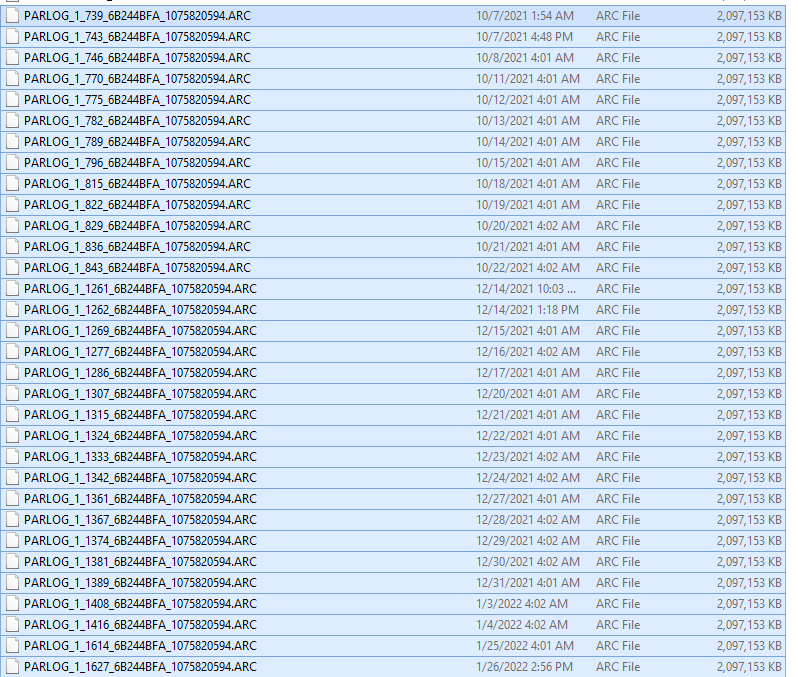
I found archive logs that have different naming convention than the default one for the source CDB. It was not even listed by RMAN during a crosscheck.

  • Normal archive naming

ARC0000001891_1075820594.0001

  • Unusual archive logs

PARLOG_1_739_6B244BFA_1075820594.ARC

These new PARLOG% archive logs were just piling up, since the refreshes started. Although it’s a Windows environment, it doesn’t change the nature of the issue. 

This image has an empty alt attribute; its file name is image-15.png

  • Where do these PARLOG archives come from? Something I haven’t seen in the multitenant documentation so far.

Root cause

It’s clear now that my PDB refreshes are behind the creation of new archives in the source CDB that will never be acknowledged by source RMAN and never used for any restore (see refresh log below).

Completed: ALTER PLUGGABLE DATABASE PSPDB_RO CLOSE IMMEDIATE
ALTER PLUGGABLE DATABASE PSPDB_RO REFRESH
03/26/2022 T13:48:18.297038-04:00
Applying media recovery for pdb-4099 from SCN 17631305104 to SCN 17635452014
Remote log information: count-5
thr-1,seq-742,logfile-F:\ORACLE\ARCH\ARC0000000742_1075820594.0001,
los-17633377023,nxs-17634469434,maxblks-3719661 … thr-1,seq-743,logfile-F:\ORACLE\ARCH\PARLOG_1_743_6B244BFA_1075820594.ARC,<---
los-17634469434,nxs-18446744073709551615,maxblks-3427379

03/26/2022T13:52:25.929467-04:00
Completed: ALTER PLUGGABLE DATABASE PSPDB_RO REFRESH


How to delete these archive logs after the refresh?

Beside deleting these files, I wanted to also check if they can be catalogued after the crosscheck failed to list them.

  • RMAN delete from the source CDB failed

RMAN> DELETE NOPROMPT ARCHIVELOG like '%PARLOG_1%';

channel ORA_DISK_1: SID=789 device type=DISK specification does not match any archived log in the repository


  • Catalog the archive log failed too because of a header validations error:

RMAN> CATALOG ARCHIVELOG ’F:\ORACLE\ARCH\PARLOG_1_2165_6B244BFA_1075820594.ARC;
RMAN-00571: ===========================================================
RMAN-00569: =============== ERROR MESSAGE STACK FOLLOWS ===============
RMAN-00571: ===========================================================

RMAN-03009:failure of catalog command on ORA_DISK_1 channel at 03/26/2022 16:51: ORA-19563:Inspect Archived Log: Partial archived log created header validation
failed for file
F:\ORACLE\ARCH\PARLOG_1_2165_6B244BFA_1075820594.ARC


Solution : Automated cleanup every night

Since these files are only used by my PDB refresh once and can’t be catalogued by the source RMAN catalog, a good old OS cleanup was in order. For that purpose, I decided to run few PowerShell commands to create a job and schedule it to run every night at 10PM.  You’d probably need a bash script configured in cron if you were in Linux.

Content of the script: PDB_refresh_cleanup.ps1
remove-item F:\ORACLE\ARCH\PARLOG_*

-- Define the trigger, user, and action

$Trigger= New-ScheduledTaskTrigger -At 10:00pm –Daily
$User= "NT AUTHORITY\SYSTEM" # Specify the account
$Action= New-ScheduledTaskAction -Execute "PowerShell.exe" -Argument "-ExecutionPolicy Bypass -File J:\19c\PDB_refresh_cleanup.ps1"

# Create and specify the name of the task

Register-ScheduledTask -TaskName "CleanupPDBarchives" -Trigger $Trigger -User $User -Action $Action -RunLevel Highest –Force

  • This job would run every night  cleanup the last PARLOG* archive created by  the PDB upon each refresh (4am).


Conclusion

This was just a new discovery on the multitenant container refresh mechanism that I didn’t expect to face. Hope this may help those who plan to configure a refreshable PDB clone as It took me months before I noticed.    

        Thank you for reading

Tuesday, March 22, 2022

OCI Bastion Service Part II: Create Bastion service using OCI CLI & Terraform

This image has an empty alt attribute; its file name is image-6.pngIntro

In part II, and after demonstrating how to use OCI Bastion service using the Console (see part I ) we will cover how to create Bastion Service using automation tools like OCI CLI and terraform as I didn’t want all these approaches to be lumped in one post. 

Quick table of contents

- Create Bastion Service using OCI CLI
- Create Bastion Service using terraform

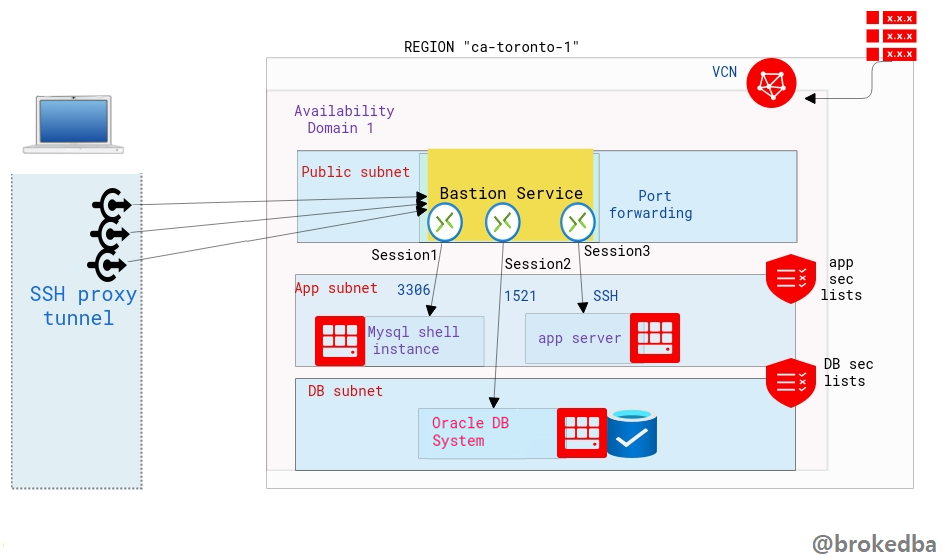
As described in part I The bastion service is linked to the target subnet and a bastion session will define the port forwarding to the target instance.
 Our environment :
  - VCN vcnterra has the private subnet db-sub with a CIDR of 192.168.78.0/24
 
-
DB instance IP is 192.168.78.10


I. Create Bastion Service from OCI CLI

     OCI CLI is perfect for quickly automate bastion service creation with many sessions/ports,.

  • Install and configure OCI CLI as described here . Assuming your default profile will be the target tenancy

1. Create the Bastion  

by specifying the compartment and subnet ids from the previous example.

$ export comp_id=ocid1.compartment.oc1..a***q 
$ export subnet_id=ocid1.subnet.oc1.ca-toronto-1.a**q

-- Create the Bastion --
$ oci bastion bastion create --bastion-type Standard --compartment-id $comp_id --target-subnet-id $subnet_id --client-cidr-list '["0.0.0.0/0"]'

-- describe the Bastion Service --
$ export bastion_id=$(oci bastion bastion list --compartment-id  $comp_id --all --query "data[0].id" --raw-output)

$ oci bastion bastion get --bastion-id $bastion_id  --query "data.{Name:name,bastion_type:\"bastion-type\",state:\"lifecycle-state\",allow_list:\"client-cidr-block-allow-list\",jump_ip:\"private-endpoint-ip-address\",timeout:\"max-session-ttl-in-seconds\"}"   --output table

+-----------+-------------+-------------+---------------+--------+---------+ | Name | allow_list |bastion_type | jump_ip | state | timeout | +-----------+-------------+-------------+---------------+--------+---------+ | bastion2* |['0.0.0.0/0']| STANDARD |192.168.78.127 | ACTIVE | 10800 | +-----------+-------------+-------------+---------------+--------+---------+


2. Create Port forwarding Bastion Session

We will use $bastion_id and other required attributes we inserted in the console earlier

$ oci bastion session create-port-forwarding  --display-name bastiontoDBSession --bastion-id $bastion_id --key-type PUB --ssh-public-key-file id_rsa_oci.pub --target-port 22 --target-private-ip 192.168.78.10 --wait-for-state SUCCEEDED 
  • export the bastion session OCID 
$ session_id=$(oci bastion session list --bastion-id $bastion_id --session-lifecycle-state ACTIVE --sort-order asc --all --query "data[0].id" --raw-output) 
  • Display the ssh proxy command details from the bastion session resource 
$ oci bastion session get --session-id $session_id --query "data.\"ssh-metadata\".command" --raw-output

ssh -i <privateKey> -N -L <localPort>:192.168.78.10:22 -p 22 ocid1.bastionsession.oc1.ca-toronto-1.ama**@host.bastion.ca-toronto-1.oci.oraclecloud.com


II. Create Bastion Service From terraform

This is also super cool to have, especially when  deploying a full stack and needing to connect to private resources right away.
The ssh command can even be extracted from the output (we’ll use the same environment).

3 x Configuration files

  • Bastion.tf for both Bastion and Bastion session
$ vi bastion.tf

resource "oci_bastion_bastion" "mybastion" { #Required bastion_type = "standard" compartment_id = var.compartment_ocid target_subnet_id = oci_core_subnet.terraDB.id #CHANGE ME name = var.bastion_name client_cidr_block_allow_list = [var.bastion_cidr_block_allow_list] } ################################## # Bastion Session ##################################
resource "oci_bastion_session" "mybastion_session" { #Required bastion_id = oci_bastion_bastion.mybastion.id key_details { public_key_content = var.ssh_public_key } target_resource_details { session_type = var.bastion_session_type target_resource_port = "22"
target_resource_private_ip_address = "192.168.78.10"
} display_name = var.bastion_session_name key_type = "PUB" session_ttl_in_seconds = "10800" }

  • variables.tf
$ vi variable.tf
variable "bastion_cidr_block_allow_list" { default= "0.0.0.0/0"} variable "bastion_name" { default = "BastionMyDB"} variable "bastion_session_type" {default = "PORT_FORWARDING"} variable "bastion_session_name" {default = "Session-Mybastion" }
variable "ssh_public_key" { default = "~/id_rsa_oci.pub"}

  • output.tf to extract all necessary information including the ssh command
$ vi output.tf
output "bastion_session_state" { value = oci_bastion_session.mybastion_session.state} output "bastion_session_target_resource_details" { value = oci_bastion_session.mybastion_session.target_resource_details} output "bastion_session_ssh_connection" { value = oci_bastion_session.mybastion_session.ssh_metadata.command}

  • After setting the subnet/compartment ids, terraform apply will create the bastion & display something like the below

This image has an empty alt attribute; its file name is image-13.png

    SSH connection Usage

  • Final result will  looks like this, notice I added & to run it in the background, so I won’t have to open another session to login to the private DB instance. 
    # ssh -i ~/.ssh/id_rsa_oci -N -L 22:192.168.78.10:22 -p 22 ocid1.bastionsession.oc1.ca-toronto-1.amaaaaaavr**a@host.bastion.ca-toronto-1.oci.oraclecloud.com &
  • Run the final ssh command to access the target resource using a sort of loopback where localhost is forwarded into the target instance IP through the opened proxy tunnel. 

    # ssh -i  ~/.ssh/id_rsa_dbcs opc@localhost
    [opc@hopsdb-oci ~]$ cat /etc/redhat-release --- target instance
    Red Hat Enterprise Linux Server release 7.9 (Maipo)
    [opc@hopsdb-oci ~]$ ifconfig  ens3
    ens3: flags=4163<UP,BROADCAST,RUNNING,MULTICAST>  mtu 9000
    inet 192.168.78.10  netmask 255.255.255.0  broadcast 192.168.78.255

     Warning:  Beware as It’s important to distinguish between :
    • ssh key pair used to used to build the Bastion session
    • ssh key pair used in the target vm (our db instance) upon creation
  • The first is used when we run the bastion command , the second is used when connecting as opc@locahost .


    Conclusion

           In this article we learned

    • How to create OCI Bastion service using  OCI CLI , and finally Terraform.
    • With the above there is no excuse not to try this super cool feature that is absolutely FREE.
    • Thanks for reading


    Monday, March 21, 2022

    OCI Bastion Service Part I: How to use it to connect to your Private Subnet (Console)

    This image has an empty alt attribute; its file name is image-6.pngIntro

    In the cloud, bastion or jump server is the only node exposed to the outside world and acts as a gateway between the private network where your backend resources (application, databases..etc) are hosted and the Internet. A Bastion runs bare minimum applications and is extremely secure. Even if any network can access it, it is still fortified against illegal entry and attack.

    But What if there was another disruptive way to provide that sort of remote access without needing to configure a VM in a public subnet ? 

    Quick table of contents

    - What is Bastion service and why is it revolutionary
    - Create Bastion Service using the Console

    What is OCI Bastion service and why is it revolutionary

    Let me demonstrate why OCI Bastion service makes your life easier. Imagine every team in your organization wanting their own Bastion VM because hey they're not fan of sharing their stuff with others. For each of your teams you would have to:
    -  Create a public subnet
    -  Create a VM in that subnet
    -  Ensure the hardening and constant auditing of your bastion VMs  
    -  Pay for the CPU and other resources of your bastion VM for each team.
     
    OCI Bastion service is a FREE serverless, clientless connectivity that enables you to connect from anywhere-on any device or platform-(without an additional agent installation) to your instances In your private subnets.
    You can leverage the ssh tunnel for literally any port via port-forwarding feature. Your target system can be a database compute instance (DBCS,MYSQL, EXACS,..) or any app server within your private subnets.

    Why OCI Bastion service is better than other providers equivalent offerings

    Exactly, with Oracle Bastion service, you not only won’t need to worry about creating, hardening or paying for a bastion vm anymore, but the service is FREE and you won’t have to install any agent nor grant permissions.        

    Create Bastion Service 

    Let’s see how to create the bastion service through the Console, OCI CLI, and terraform. The bastion service  is linked to the target subnet and a bastion session will define the port forwarding to the target instance.
     Our environment :
      - VCN vcnterra has the private subnet db-sub with a CIDR of 192.168.78.0/24
     
    -
    DB instance IP is 192.168.78.10

    I. From the console 

    • Under Identity & Security section on the Console menu, click `Bastion` or just search Bastion on the Console browser.

    This image has an empty alt attribute; its file name is image-6.png

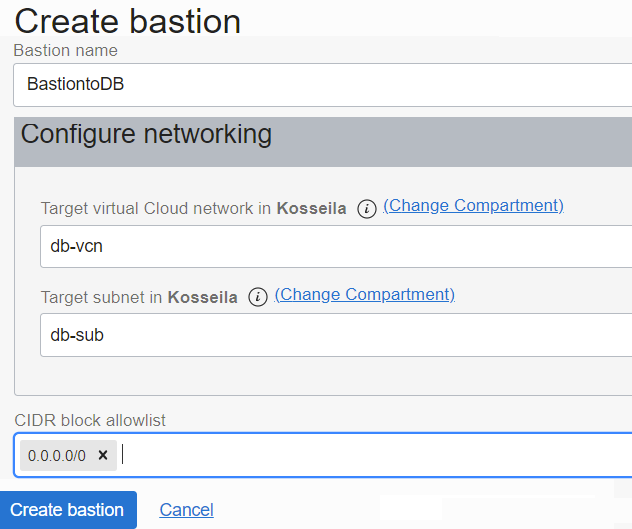
    • Hit  “Create Bastion”, and give a name for your Bastion Service, select the target VCN & subnet, along with the CIDR block representing a white-list network from which you want to connect to the target instance, and create the Bastion.

                                                      This image has an empty alt attribute; its file name is image-8.png

    CIDR allowlist: 0.0.0.0/0 means you can ssh the db instance from anywhere.

    2. Create the bastion session

    We will now create the bastion session where we will define the forwarded port through the tunnel and the target IP

    • Click on the Bastion name to access the Bastion details page from which you can click on create bastion session.  

    This image has an empty alt attribute; its file name is image-10.png

    Note:
    There are two session types, SSH Managed which requires a cloud agent and port forwarding session which we need.
    You can either generate, upload, or paste your SSH public key.  

    3. Generate the SSH command

    • Once the session is created click on the right side 3 dots button and select Copy SSH command.

      This image has an empty alt attribute; its file name is image-11.png 
    • It should look like the below . You will need to replace privateKey with it’s local path and Localport with 22

      This image has an empty alt attribute; its file name is image-12.png
    • Final result will  looks like this, notice I added & to run it in the background, so I won’t have to open another session to login to the private DB instance. 
      # ssh -i ~/.ssh/id_rsa_oci -N -L 22:192.168.78.10:22 -p 22 ocid1.bastionsession.oc1.ca-toronto-1.amaaaaaavr**a@host.bastion.ca-toronto-1.oci.oraclecloud.com &
    • Run the final ssh command to access the target resource using a sort of loopback where localhost is forwarded into the target instance IP through the opened proxy tunnel. 

      # ssh -i  ~/.ssh/id_rsa_dbcs opc@localhost
      [opc@hopsdb-oci ~]$ cat /etc/redhat-release --- target instance
      Red Hat Enterprise Linux Server release 7.9 (Maipo)
      [opc@hopsdb-oci ~]$ ifconfig  ens3
      ens3: flags=4163<UP,BROADCAST,RUNNING,MULTICAST>  mtu 9000
      inet 192.168.78.10  netmask 255.255.255.0  broadcast 192.168.78.255

       Warning:  Beware as It’s important to distinguish between :
      • ssh key pair used to used to build the Bastion session
      • ssh key pair used in the target vm (our db instance) upon creation
    • The first is used when we run the bastion command , the second is used when connecting as opc@locahost .
        

      Conclusion

             In this article we learned

      • How slick is OCI Bastion service becoming a game changer thanks to its serverless connectivity to private networks.
      • How OCI Bastion service compares to the competition’s offering available in other Cloud providers
      • How to create OCI Bastion service using the Console.
      • With the above there is no excuse not to try this super cool feature that is absolutely FREE.
      • Thanks for reading


        Monday, March 14, 2022

        Terraform in OCI: The infamous error 404-NotAuthorizedOrNotFound

        This image has an empty alt attribute; its file name is image.pngIntro

        Terraform uses API to interact with your Cloud provider’s platform. Hence many error messages thrown by your terraform deploy come directly from the cloud platform (i.e OCI services) . In some cases, they prove to be very unhelpful and empty of insights, leaving you wonder what really is breaking your deployment. These are part of what we call the API Errors. In my case, I spent weeks pulling my hair off to find what was really behind my API 404 error.
        Therefor, I decided to summarize what was documented and what really happened.

        Service API Errors


        First, as It’s always better to lay down the basics, I would like to give a brief preview of API errors structure for OCI.
        Service error messages returned by the OCI Terraform provider include the following information:

        • Error - the HTTP status and API error codes
        • Provider version - the version of the OCI Terraform provider used to make the request
        • Service - the OCI service responding with the error
        • Error message - details regarding the error returned by the service
        • OPC request ID - the request ID
        • Suggestion - suggested next steps


        For example as shown in the official OCI documentation, the output is very similar  than common REST API errors

        Error: <http_code>-<api_error_code>
        Provider version: <provider_version>, released on <release_date>. This provider is <n> updates behind to current.
        Service: <service>
        Error Message: <error_message>
        OPC request ID: exampleuniqueID
        Suggestion: <next_steps>


        Commonly returned service errors.

            This list is not exhaustive and include only the error message and suggestion

        • "400-LimitExceeded" service limits exceeded for a resource 
        • Error: 400-LimitExceeded
          Error Message: Fulfilling this request exceeds the Oracle-defined limit for this
          tenancy for this resource type.
          Suggestion: Request a service limit increase for this resource <service>
        • "500-InternalError"  definitely means you’ll have to call your Oracle support friends ;)
        • Error: 500-InternalError
          Error Message: Internal error occurred
          Suggestion: Please contact support for help with service <service>


        When are API credentials checked? 

        • Terraform core workflow

          Let’s review terraform core workflow and its actions for the sake of completeness.

        • Workflow commands:
          init          Prepare your working directory for other commands
          validate   Check whether the configuration (modules, attribute names, and value types) is valid
          plan         Show changes required by the current configuration
          apply       Create or update infrastructure
          destroy    Destroy previously-created infrastructure

          Now the thing is, although init loads the cloud provider plugin, none of the first three commands will verify the API credentials for you. I bluntly assumed otherwise, which was clumsy but it’s never been very explicit in the doc.
          Bottom line:
          terraform apply is the only step where API credentials are checked, but that’s not all...      


        What the heck is 404-NotAuthorizedOrNotFound  

        • What I see

          This image has an empty alt attribute; its file name is image-1.png

        • As you can see, the suggestion was nowhere close to help me out with this conundrum.

        • My configuration ought to deploy a DB system stack & all previous commands (init,validate,plan) were successful.

        • What OCI API errors page says
          I found this note: `` Verify the user account is part of a group with the appropriate permissions to perform the actions in the plan you are executing``

                However, I could still create resources in the console with the same user without any permission issue.
                After struggling with it for several days, I then decided to put it on ice for few weeks.     
             
        • The real Root cause 

        2 weeks later, I accidentally found where all this mess came from, and the problem was right under my nose this whole time. I just decided to check my terraform.tfvars and each of OCI authentication variables one by one.

        That’s where I noticed that my credentials were mixed up between 2 tenancies

        # Oracle Cloud Infrastructure Authentication
        tenancy_ocid     = "ocid1.tenancy.oc1.."      # TENANCY 1
        user_ocid        = "ocid1.user.oc1.."         # USER FROM TENANCY 2
        fingerprint      = "1c:"                      # TENANCY 1 
        private_key_path = "~/oci_api_key.pem"        # TENANCY 1
        public_key_path  = "~/oci_api_key_public.pem" # TENANCY 1
        compartment_ocid = "ocid1.compartment.oc1."   # COMPARTMENT 2  
        • I agree, that’s pretty screwed up, but this can happen when working with different tenancies from our workstation.   
        • Once the discrepancy corrected the terraform stack was deployed as expected since the plan was successfully run. 


        Conclusion

      • It’s very easy to make mistakes when deploying using terraform especially when working with different tenancies.
      • We also noticed how API errors may just not be the most helpful insight to understand the root cause of such issues.
      • Bottom line is, always verify your credentials along with relying on source versioning platforms where credentials can be     
             safely saved for each of your environments/repos (
        Gitlab, OCI devops, terraform Cloud).
      • Additionally, the above platforms allow CI/CD pipelines to automate your testing when your workload/team starts to grow.
      • Hope this post will help those who encounter the same issue and spare them days of unnecessary troubleshooting.
      • Thanks for reading